Homelab with NixOS, Jupyter, and More
Table of Contents
For half a year (and more), I’ve been thinking about building a computer to learn and train ML models on, as well as to host my web applications on. Over this past half month, I finally bit the bullet, opting for a Ryzen 3700X paired with an Nvidia 1080 Ti. The full parts list can be found here. I chose to install NixOS, a declarative operating system, and this post outlines the full software-side process, including several hurdles I came across.
Rationale For Parts
I chose a 3700X mainly for the insane number of cores, as hosting several concurrent applications would require a lot of multithreading. I considered the 3600, and I figured the increase in cores was worth the small bump in price. For the GPU, I debated between the 1080 Ti and a 2070 Super, and I eventually opted for the 1080 Ti for the increased memory, figuring that the FP16 performance wouldn’t be seen by me (at least not for a while). (Later on in the month, my neighbor gave me an old computer, and I found a 1080 inside. I’m extremely lucky and grateful for him :’).) The main hard drive is an NVMe SSD. The hard drives are used Barracuda drives, and will be purchased off of Craigslist. Eventually, once the coronavirus wave passes and I purchase the hard drives, I will use bcache to turn the SSD into a caching layer, with the main memory on the hard drives. The configuration will use LVM on top of software RAID 6, so that storage is very easily configurable and reliable.
NixOS
NixOS installation is pretty straightforward. Their guide is very well written, so I defer to them for installation instructions. My dotfiles can be found here.
JupyterHub
Since I would be doing a decent amount of computation, and since my main laptop is a Pixelbook, I wanted to be able to have access to a Python interpreter anywhere, particularly hosted on a website. As a result, I decided to use Jupyterhub, which is pretty stable and has really good documentation. I set up the installation in an LXC container running Ubuntu 18.04, following the instructions here.
Installing new kernels for JupyterHub was a huge headache, however. There are a lot of package managers for Python, including virtualenv, venv, and conda, and often their usages overlap with one another. Maintaining them is quite the headache! For JupyterHub, conda is used to make environments, and kernels are used when executing code inside JupyterHub. Below is a detailed rundown of creation of a new conda environment for a particular user:
Creating a New Environment
- First, we create the
condaenvironment. Here, our conda environment is calledconda_envand we install theipykernelandmatplotlibpackages. You can choose your packages, but note thatipykernelmust be installed:conda create --name "conda_env" python=3.7 ipykernel matplotlib - Next, we activate the conda environment:
conda activate conda_env - Now, since we have our conda environment activated, the
pythonbinary will be bound to thepythonpackage that thecondaenvironment created. (You can usewhich pythonto see that in action!) Now, we can usepython -m ipykernel install --user --name "kernel_name"to install a new kernel with the namekernel_name.
Listing Environments
- Listing
condaenvironments:conda info --envs - Listing JupyterHub kernels:
jupyter kernelspec list
Deleting Kernels and Conda Environments
- First, we remove the jupyter kernel:
jupyter kernelspec remove "kernel_name" - Next, we remove the conda environment that created the kernel:
conda remove --name "conda_env" --all
Bonus: Installing Packages From requirements.txt
- Follow steps from Creating a New Environment, but before installing the kernel, run
conda install --file requirements.txtto install the packages to thecondaenvironment. Then, proceed as usual.
Making LXC Play Nice
The last thing I needed to do to make the container GPU-accelerated was to pass the GPU through as a device from the host OS to the container. It was definitely not trivial.
GPU Passthrough
This was by far the most annoying part of this build. Stéphane Graber’s blog has a very very well written post about how to get GPU passthrough to work, but since I am using different operating systems, I will highlight some things that might trip others up:
- The Nvidia driver version must be exactly the same. This includes the minor version! A driver mismatch will cause you endless pain and suffering. For those who are venturing down this path, I recommend to first install the host Nvidia driver and CUDA driver, and then download matching versions for the LXC client.
- When you install the
.runNvidia driver on the LXC client, you might run into something along the lines of “xxx kernel module is already installed”. To fix this, append--no-kernel-moduleto the script (so it looks something likesudo sh NVIDIA-Linux-x86_64-440.36.run --no-kernel-module). I don’t fully understand this, but my understanding is that since LXC containers use the host kernel, the module is getting loaded by the host operating system, so the kernel module doesn’t need to be installed by the guest container. Here, that would mean that we would only need to install the driver for the tools, not for the kernel module).
Bind-Mounting Folders
The next thing I wanted to do was to bind-mount folders from my host operating system into the container to be accessible by JupyterHub. Since the installation of JupyterHub meant that each user would get their own home folder, I figured bind-mounting home from the host operating system to home on the container would be trivial. As all things go, it wasn’t.
Again, Stéphane Graber’s blog has another post on getting user mappings working in containers. This time, I didn’t run into particular issues, and following his mappings worked very well.
RAID, LVM, and Bcache
Once the coronavirus situation dies down, I will be able to purchase the hard drives, and I will edit this part with the installation process.
Update: And it’s here! Check out the new blog post here.
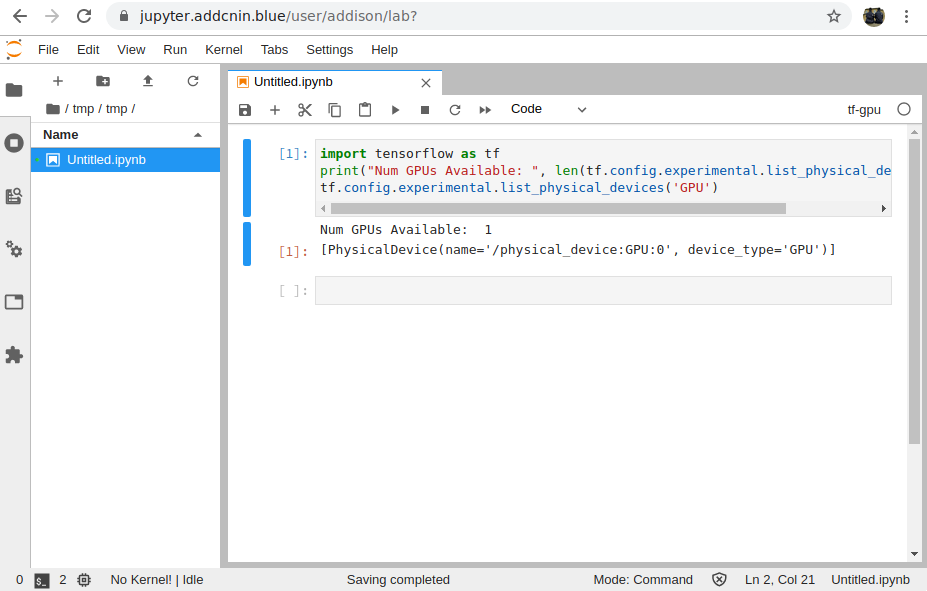
Some Screenshots
Jupyterhub up and running: