Homelab: Part 2
The hard drives finally came, so in this post, I’ll be documenting RAID (mdadm) and LVM (with lvmcache). I have a Samsung 970 EVO NVMe SSD which already has 3 partitions in this order: boot, root, swap (without LVM). In this post, we will be adding 4x 3TB Seagate Barracuda drives in RAID10 with mdadm, and with LVM top. We will then move the root partition to the RAID10 array.
For the reader:
- The SSD is at
/dev/nvme0n1. Partitions are like this:/dev/nvme0n1p1. - The hard drives are at
/dev/sd{a,b,c,d}.
See my previous post for more background information.
Architectural Concerns
Here, we build a RAID array, then build LVM on top. While LVM itself implements RAID, it seems that there is not as much documentation as compared to mdadm’s, so I went with this approach. For the caching layer, I originally considered bcache. However, it is recommended to put LVM on top of bcache, and since I ended up moving the data to the RAID array first, it was very annoying to have to move data again, so I chose to go with lvmcache.
MDADM First
Creating a RAID array was straightforward. I followed the instructions over at DigitalOcean, substituting in 10 for 0: mdadm --create --verbose /dev/md0 --level=10 --raid-devices=4 /dev/sda /dev/sdb /dev/sdc /dev/sdd. It should be noted that once the RAID array is created, the entire array is exposed to the operating system as one drive. Here, we created it as /dev/md0, so we will be using that drive.
LVM
References: Install Arch Linux on LVM, Arch Linux LVM Wiki. I would recommend reading through “Install Arch Linux on LVM”, as it goes through the steps of setting up a drive on LVM. Read up to the parts where they actually install the OS.
Now, we set up the array for LVM:
- Create the physical volume:
pvcreate /dev/md0 - Create the volume group:
vgcreate VolGroup00 /dev/md0 - Create logical volume. Here we make a volume that fills up the entire disk, as is my usecase:
lvcreate -l 100%FREE VolGroup00 -n lvolroot
Then, we copy over the data from the SSD:
bsrepresents block copy size; 300M is a good number for my usecase.status=progressshows our copy progress:dd if=/dev/nvme0n1p2 of=/dev/VolGroup00/lvolroot bs=300M status=progress
At this point, modify /etc/fstab to mount /dev/VolGroup00/lvolroot as the root partition. You may need to enable extra kernel modules for LVM. Try to boot from this partition to ensure that everything is fine, since we will be deleting the original root partition. When booting with the new partition, use lsblk and df -h to ensure that the root drive is mounted at the new location, and that the old partition is no longer used. After this point, there will be data loss if the copy failed.
After we verify that the partition has been correctly copied over, we convert the original SSD to be a cache. There is a very good article here about bcache and lvmcache. The instructions for lvmcache are good, but the final few steps didn’t work for me. A brief read-through is recommended to understand how lvmcache works. Arch wiki also has a concise article. (In this step, if there are issues with lvm commands, it is likely that kernel modules need to be loaded. I used this patch, double checking existing boot.initrd.availableKernelModulesboot.initrd.availableKernelModules to make sure they weren’t overriden by using nixos-option boot.initrd.availableKernelModules)
- Extend our current volume group to take up the space of the old SSD root partition:
vgextend VolGroup00 /dev/nvme0n1p2 - Now, we create a cache pool and use it as the caching layer of our new root partition, all in one step. I chose to use a writeback cache since I can sustain small write losses in the case the SSD fails, and given that it’s so new, I don’t expect it to fail anytime soon (knocking on wood):
lvcreate --type cache --cachemode writeback -l 100%FREE -n cache /dev/VolGroup00/lvolroot /dev/nvme0n1p2
Reboot, and we’re done!
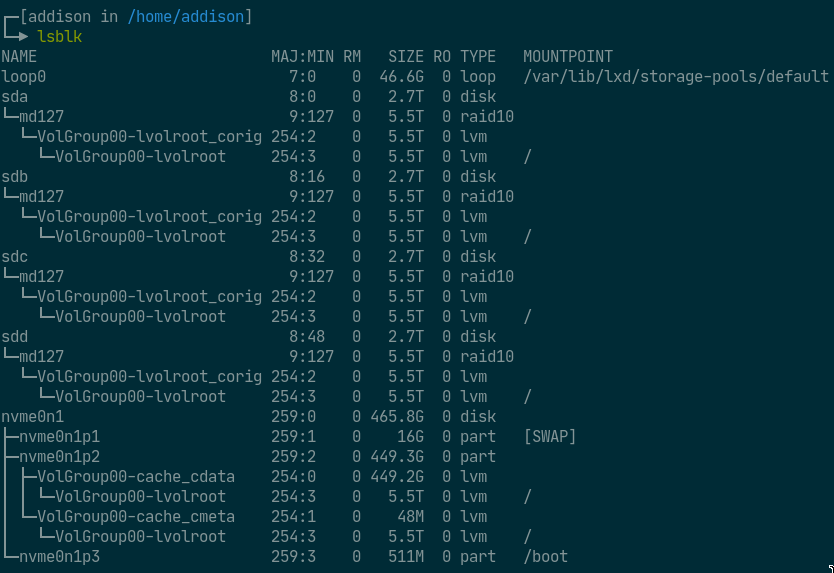
Screenshots
Look at the space!